
- スマートスティック
- INTUITION
- PS5(V3)
- PS5(V2)
- PS4(V3)
- PS4(V2)
- XBOXプロモデル
- PS4 FireBird
Void Gaming
スマートスティック設定マニュアル
※本マニュアルは、2025年2月13日18:00以降にご注文された「スマートスティック搭載Voidコントローラー For PS5|PC」に対応しております。それ以前にご注文いただいたスマートスティックには、本機能は搭載されておりませんのであらかじめご了承ください。
スマートスティックは、細かい操作調整が可能なカスタマイズ機能を搭載したコントローラーです。本マニュアルでは、スマートスティックの設定方法を解説します。
■調整できる機能一覧
8方向の入力距離調整
縦・横・斜め方向のスティックの入力距離を調整することで、感度や入力範囲を最適化できます。
内側デッドゾーン調整
スティックの中心付近に反応しない範囲を設定する機能です。基本的には「入力の繊細さ」と「安定感」のバランス調整になります。
ニュートラルポジション調整
スティックの基準位置(ニュートラル) を手動で設定し、経年劣化等で発生するズレを補正できます。
■まずは知っておきたい!プリセットの切り替え方法
このコントローラーには、異なる操作感を選べる4つのプリセットが搭載されています。
※ご注文時期によって初期設定が異なります。最新版では、Void Gaming推奨の2つのプリセット(横トラッキング・リコイル特化)を初期状態からご利用いただけます。
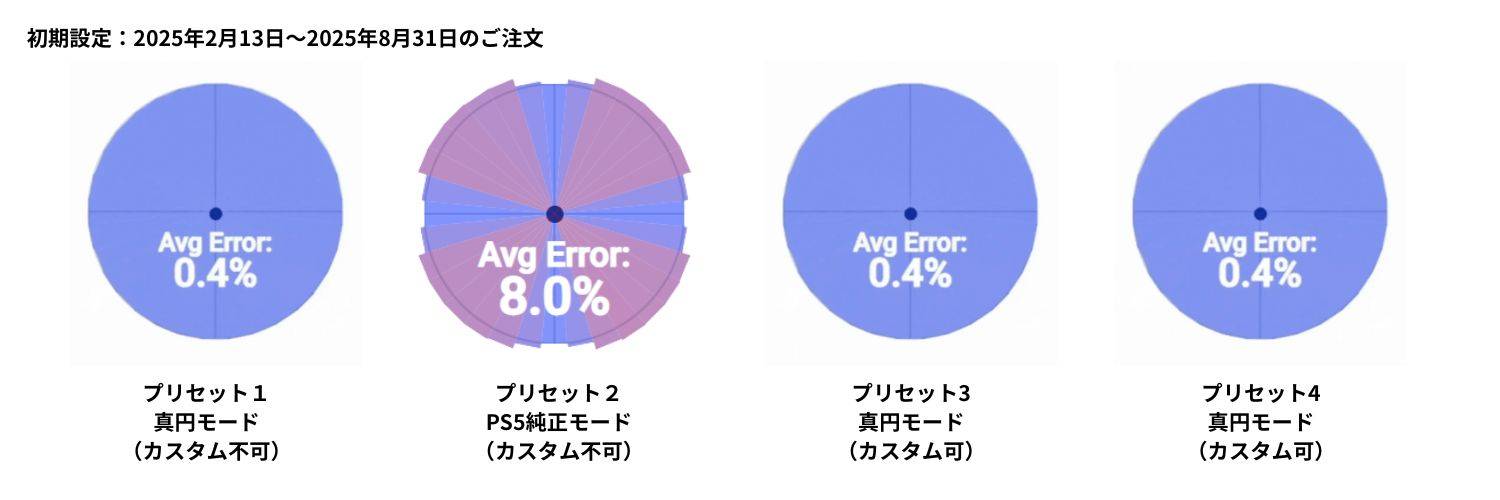
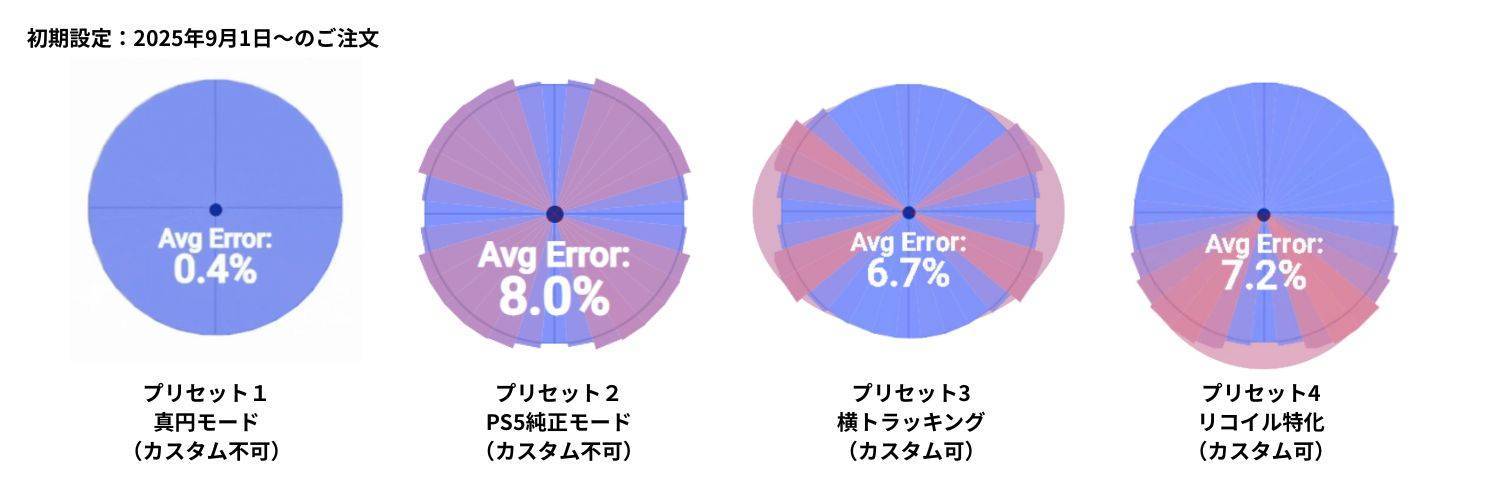
標準プリセット(①②) は、すぐにプレイできるようにあらかじめ設定されたモード。
カスタムプリセット(③④) は、スティックの入力距離を自由に調整できるモードです。
プリセット①(真円モード)
– 全方向の入力範囲を均等にした設定
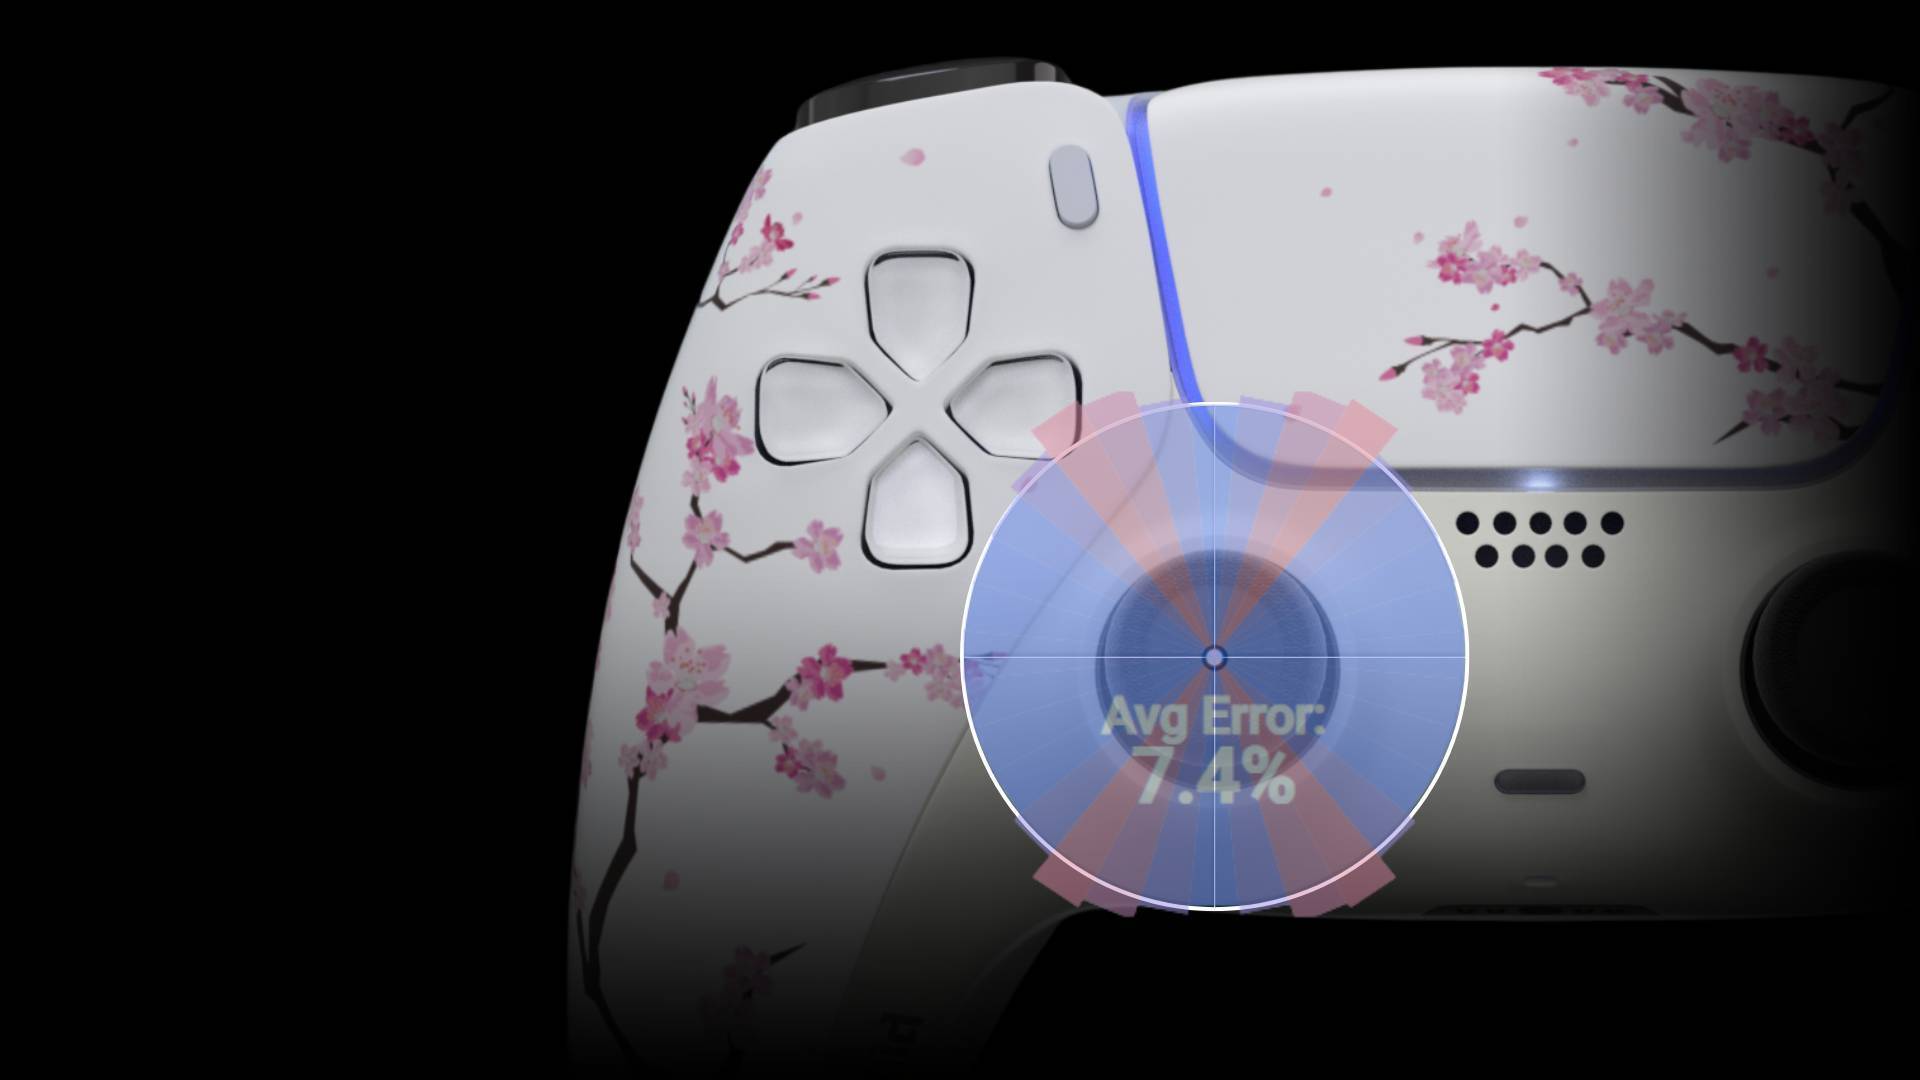
プリセット②(PS5純正モード)
– 純正PS5コントローラーの操作感を再現
プリセット③(カスタム)
– 入力距離を自由に変更できるカスタム設定
プリセット④(カスタム)
– 入力距離を自由に変更できるカスタム設定
プレイスタイルに応じて、自分に合ったプリセットを選び、必要に応じて切り替えてください。
■プリセット切替手順
--------前準備---------
ステップ1.コントローラーの設定ロックを解除する(緑点灯)
コマンド: L1 + R1 + L2 + R2 + L3 + R3 を2秒間長押し(赤点灯した場合は、再度コマンドを入力)
--------プリセットの切替--------
ステップ2.プリセット切替コマンドを入力(紫点灯)
コマンド: L1 + R1 + 両スティックを下方向に倒して L3 + R3押し込み
ステップ3.変更したいスティックを選択
左スティックを変更する場合:左スティック押し込み(L3)
右スティックを変更する場合:右スティック押し込み(R3)
ステップ4.十字キーでプリセットを選択
↑ボタン: 真円モード(紫点灯)
→ボタン: PS5純正モード(黄点灯)
↓ボタン: カスタム設定③(青点灯)
←ボタン: カスタム設定④(オレンジ点灯)
もう片方のスティックも変更したい場合はステップ3に戻る。
ステップ5.プリセットの保存
プリセットの切替が完了したら☓ボタンで保存してください。(白点灯)
--------最後に---------
ステップ6.全ての設定が完了したら設定ロックをON(赤点灯)
コマンド: L1 + R1 + L2 + R2 + L3 + R3 を2秒間長押し(緑点灯した場合は、再度コマンドを入力)
■クイック切り替え(プリセット①②のみ)
コマンドを押すたびに、プリセット①(真円)とプリセット②(PS5純正)が交互に切り替わる機能です。
カスタムプリセット(③・④)はクイック切り替えに対応していません。
■クイック切替手順
ステップ1.クイック切り替えのコマンドを入力
コマンド: L1 + R1 + × + ▢ + 切り替えたいスティックを押し込み(L3 または R3)を3秒間長押し
押し込むたびにプリセット1(真円)とプリセット2(PS5純正)が交互に切り替わります
※コントローラーのロック解除は不要です。
■8方向の入力距離調整(スティック感度の調整)
8方向の入力距離調整とは?
スティックの入力距離を調整することで、操作の感度や反応範囲を変更できます。この機能では、上下・左右・斜めの計8方向の入力距離を細かく設定可能です。調整にはGamepad Testerの使用が便利です。
基本的には入力距離を円より外側に広げて調整します。
入力距離を円より外側に広げると
・その方向のスティック感度が上がります。(外側デッドゾーンが生じるため)
入力距離を円より内側に狭めると(非推奨)
・その方向のスティック入力できない範囲が生じます。※感度は下がりません
・狭めすぎると加速やオートスプリント機能に加え、コントローラーの設定コマンドが反応しなくなることもあります。
Gamepad Testerの仕様について
Gamepad Testerでは、縦・横の入力値が最大1.0までしか表示されません。そのため、テスター上では 斜め方向の入力範囲だけが広がって見える仕様になっていますが、実際の設定は正しくコントローラーに適用されています。
■8方向の入力距離 設定手順
調整の際はGamepad Testerが便利です。ボタンを押した回数を数えながら行いましょう。
--------前準備---------
ステップ1.コントローラーの設定ロックを解除する(緑点灯)
コマンド: L1 + R1 + L2 + R2 + L3 + R3 を2秒間長押し(赤点灯した場合は、再度コマンドを入力)
--------プリセット切替---------
ステップ2.プリセット切替コマンドを入力(紫点灯)
コマンド: L1 + R1 + 両スティックを下方向に倒して L3 + R3押し込み
ステップ3.調整したいスティックを選択
左スティックを調整する場合:左スティック押し込み(L3)
右スティックを調整する場合:右スティック押し込み(R3)
ステップ4.十字キーで調整したいプリセットを選択
↓ボタン: カスタム設定③(青点灯)
←ボタン: カスタム設定④(オレンジ点灯)
プリセットが選択できたら☓ボタンで確定してください。(白点灯)
--------入力距離の調整---------
ステップ5.8方向の入力距離調整コマンドの入力(青点灯)
コマンド: L1 + R1 + 両スティックを上方向に倒して L3 + R3押し込み
ステップ6.入力距離の調整
①左スティックまたは右スティックを調整したい方向に倒す。(上下・左右・斜めの計8方向)
②入力距離を調整
・↑ボタン で入力距離を広げる
・↓ボタン で入力距離を狭める
・□ボタンで入力距離をリセット(対象方向のみ)
③別の方向を調整したい場合は①へ戻る。
※↑↓のボタンを押した回数を数えながら調整してください。
ステップ7.入力距離の設定を保存
全方向の入力距離を調整が完了したら☓ボタンで保存(白点灯)
ステップ8.再度調整したい場合
同じプリセットを再調整したい場合→ステップ6に戻る
別のプリセットの調整をしたい場合→ステップ3に戻る
--------最後に---------
ステップ9.全ての設定が完了したら設定ロックをON(赤点灯)
コマンド: L1 + R1 + L2 + R2 + L3 + R3 を2秒間長押し(緑点灯した場合は、再度コマンドを入力)
注意:
・入力距離を円より内側に狭めすぎると設定に使うコマンドも反応しなくなります、その場合は初期化してください。
・Gamepad Tester(https://hardwaretester.com/gamepad)は外部ツールのため、VoidGamingでは動作保証やサポートを行っていません。
■ 内側デッドゾーンの設定方法
内側デッドゾーンとは?
内側デッドゾーンとは、スティックの中心付近に反応しない範囲を設定する機能です。デッドゾーンを設定すると操作感が変わるため、調整後はゲーム内の設定を確認し、必要に応じて再調整してください。
基本的には「入力の繊細さ」と「安定感」のバランス調整になります。
デッドゾーンを小さくすると
・繊細な操作が可能になり、細かい入力にも正確に反応する
・ただし、スティックのわずかなブレによって、操作が不安定になることも
デッドゾーンを大きくすると
・スティックの中心付近でのブレを抑え、安定した操作ができる
・また、ドリフト現象の対策にもなる
・ただし、細かい入力がカットされるため、微調整が効きにくくなる
■内側デッドゾーン 設定手順
内側デッドゾーンは全プリセット共通設定になります。
--------前準備---------
ステップ1.コントローラーの設定ロックを解除する(緑点灯)
コマンド: L1 + R1 + L2 + R2 + L3 + R3 を2秒間長押し(赤点灯した場合は、再度コマンドを入力)
--------内側デッドゾーンの調整---------
ステップ2.内側デッドゾーン設定コマンドを入力
コマンド: L1 + R1 + 両スティックを右方向に倒して L3 + R3押し込み
ステップ3.調整したいスティックを選択
左スティックを調整する場合:左スティック押し込み(L3)
右スティックを調整する場合:右スティック押し込み(R3)
ステップ4.十字キーで内側デッドゾーンを調整
↑ボタン で縦方向のデッドゾーンを広げる
↓ボタン で縦方向のデッドゾーンを狭める
→ボタン で横方向のデッドゾーンを広げる
←ボタン で横方向のデッドゾーンを狭める
□ボタン で対象スティックのデッドゾーンをリセット
もう片方のスティックを調整したい場合は→ステップ3に戻る
ステップ5.内側デッドゾーンの設定を保存
内側デッドゾーンの調整が完了したら☓ボタンで保存(白点灯)
--------最後に---------
ステップ6.全ての設定が完了したら設定ロックをON(赤点灯)
コマンド: L1 + R1 + L2 + R2 + L3 + R3 を2秒間長押し(緑点灯した場合は、再度コマンドを入力)
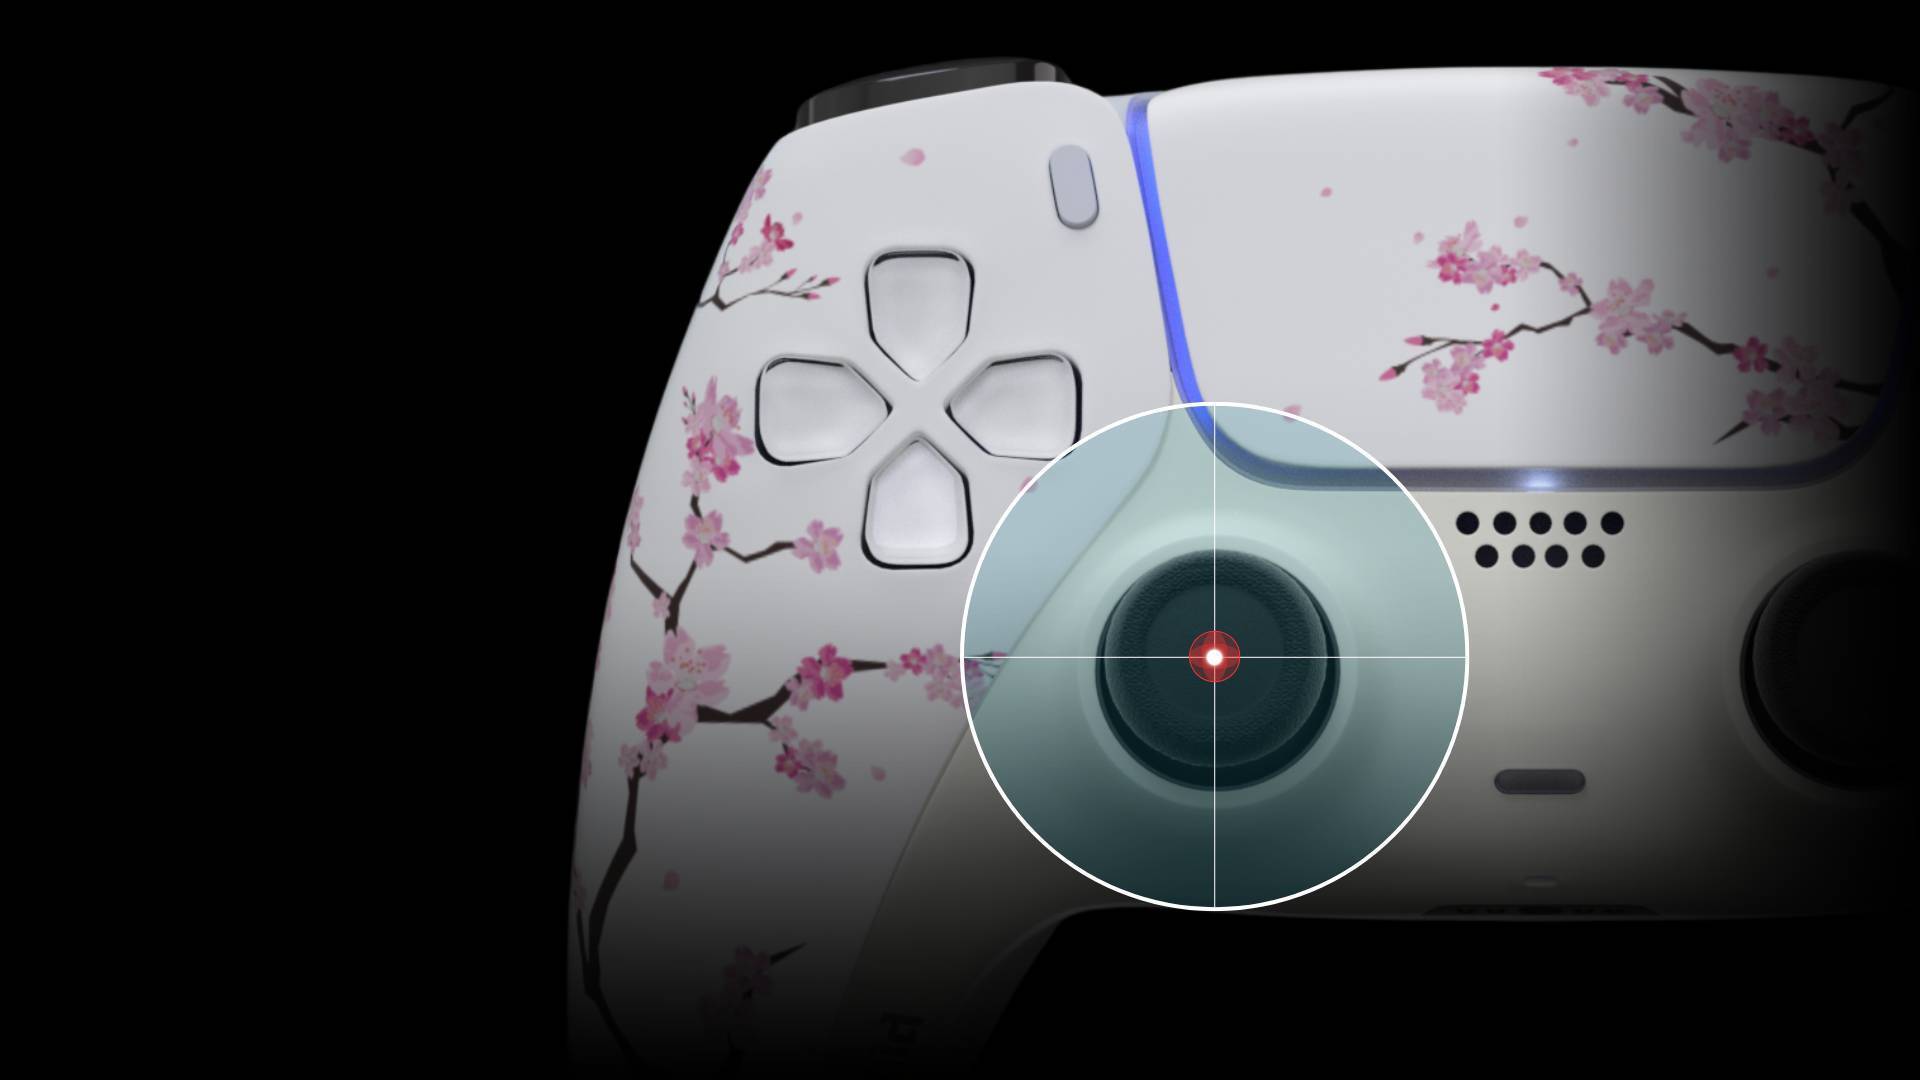
■ニュートラルポジションの設定方法
ニュートラルポジションとは?
ニュートラルポジションとは、スティックの基準となる位置を設定する機能です。この設定を行うことで、スティックの誤動作を防ぐことができます。
基本的には、スティックが正しい位置にある状態で設定してください。
ニュートラルポジションがズレるとその状態がニュートラルポジションとして記録されてしまい、スティックの動作が正常に機能しなくなることがあります。
ニュートラルポジションのリセットが有効な場面
・スティックが勝手に動く、または意図しない入力が発生するとき
・ドリフトが発生した際に内側デッドゾーンの調整ではなく、ニュートラルポジションのリセットで対処したいとき(上級者向け)
■ニュートラルポジション 調整手順
ニュートラルポジションは全プリセット共通設定になります。
-------前準備---------
ステップ1.コントローラーの設定ロックを解除する(緑点灯)
コマンド: L1 + R1 + L2 + R2 + L3 + R3 を2秒間長押し(赤点灯した場合は、再度コマンドを入力)
--------ニュートラルポジションの設定---------
ステップ2.ニュートラルポジション調整のコマンド入力
コマンド: L1 + R1 + 両スティックを左方向に倒して L3 + R3押し込み
ステップ3.調整したいスティックを選択
左スティックを調整する場合:左スティック押し込み(L3)
右スティックを調整する場合:右スティック押し込み(R3)
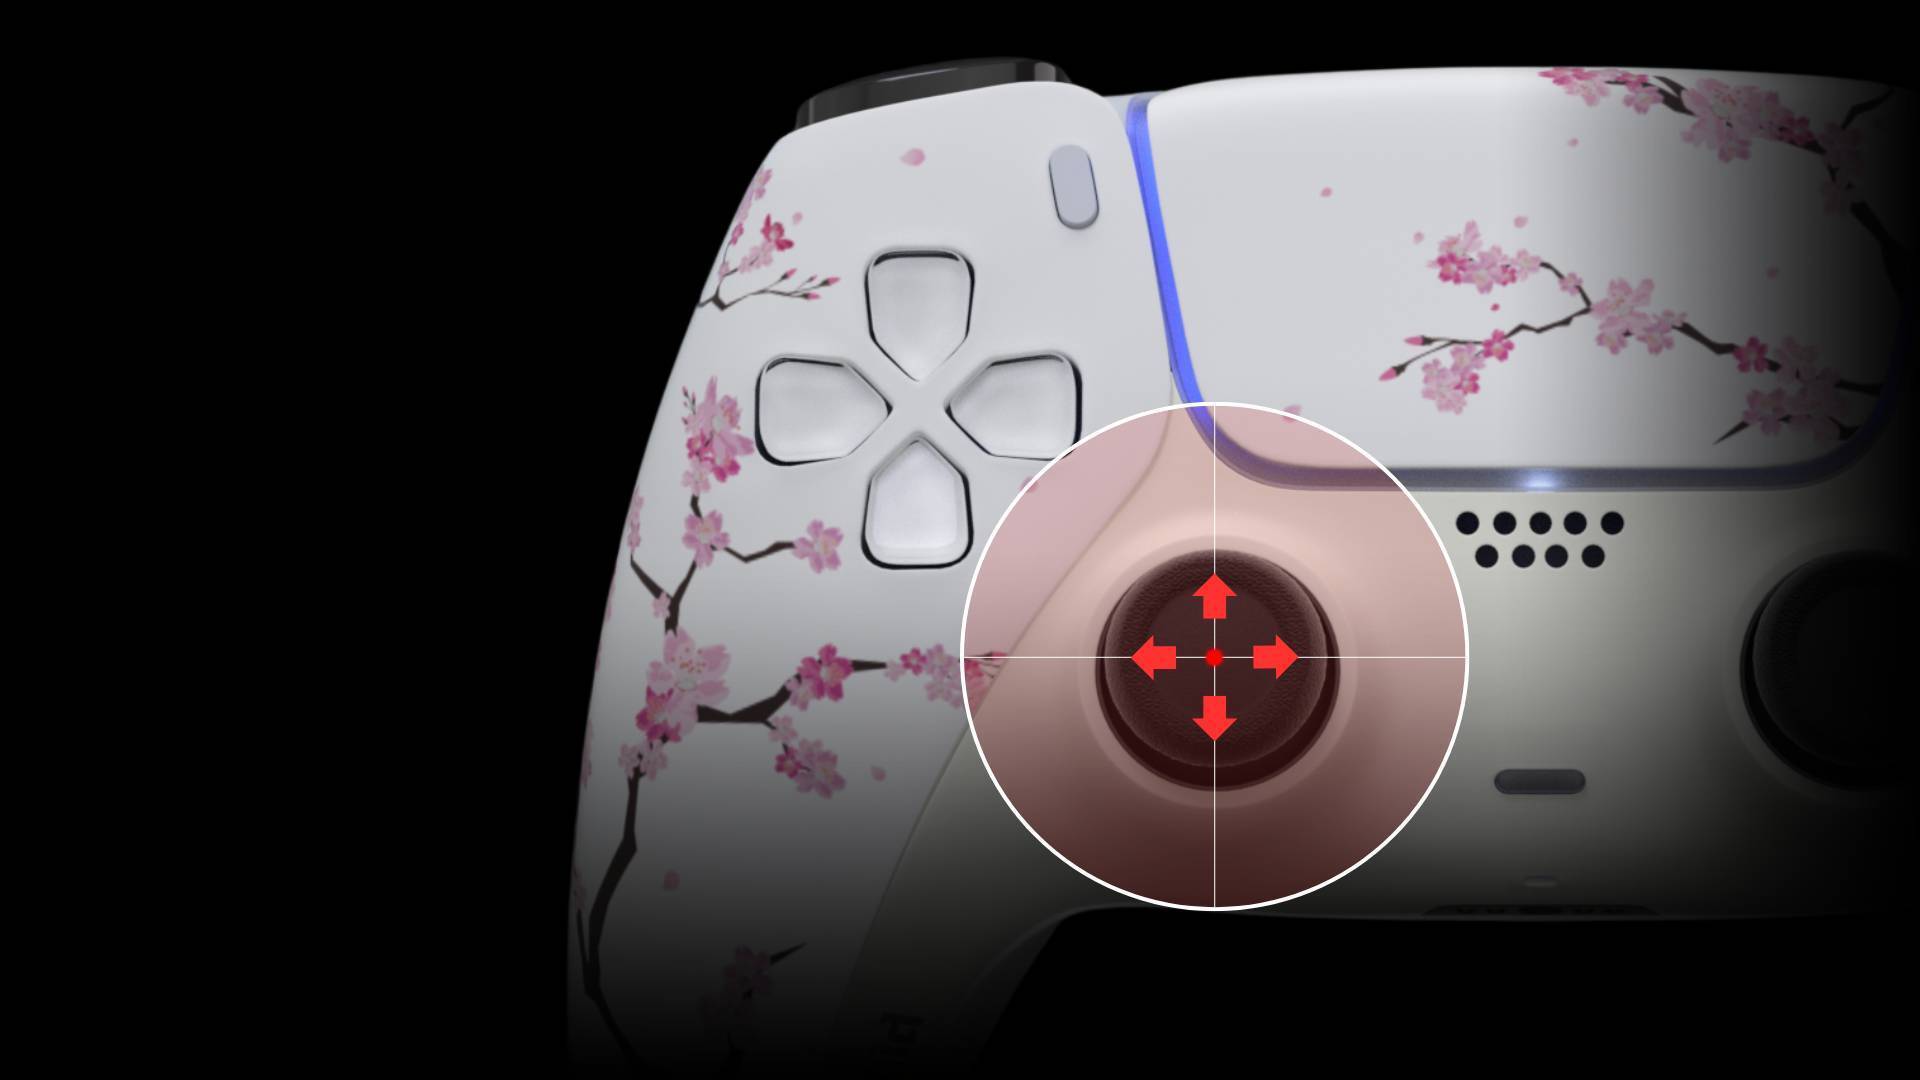
ステップ4.十字キーでニュートラルポジションを調整
十字キーでニュートラルポジションを移動
□ボタンでニュートラルポジションをリセット(対象スティックのみ)
もう片方のスティックを調整したい場合は→ステップ3に戻る
ステップ5.ニュートラルポジションの設定を保存
ニュートラルポジションの調整が完了したら☓ボタンで保存(白点灯)
--------最後に---------
ステップ6.全ての設定が完了したら設定ロックをON(赤点灯)
コマンド: L1 + R1 + L2 + R2 + L3 + R3 を2秒間長押し(緑点灯した場合は、再度コマンドを入力)
■キャリブレーションの方法(スティック位置の再調整)
キャリブレーションとは?
キャリブレーションとは、スティックの基準となる位置を正しく調整する機能です。スティックの反応が明らかにおかしい場合、適切にキャリブレーションが行われていない可能性があります。
初期化後は必ずキャリブレーションを行ってください。
コントローラーを初期化した後は、必ずキャリブレーションを行ってください。設定しないと正常に動作しません。
また、RスティックとLスティックどちらも忘れずに行ってください。
キャリブレーションが必要な場面
・初期化を行った後
・スティックの動作が明らかに異常で、意図しない方向に入力される場合
(僅かな場合はニュートラルポジションや内側デッドゾーンを見直してください。)
■キャリブレーション手順
--------前準備---------
ステップ1.コントローラーの設定ロックを解除する(緑点灯)
コマンド: L1 + R1 + L2 + R2 + L3 + R3 を2秒間長押し(赤点灯した場合は、再度コマンドを入力)
--------キャリブレーション---------
ステップ2.キャリブレーションのコマンドを入力
コマンド: L1 + R1 + L2 + R2 + ○ + × + △ + ▢ を同時押し
ステップ3.ニュートラルポジションの確定(赤色)
スティックを静止させた状態で☓ボタンを押す
ステップ4.入力可能範囲の指定(黄色)
LスティックとRスティックの外側を3周ほど回し、☓ボタンで確定
・必ず両方のスティックで行ってください。
・全⽅位の最⼤距離を計測するため、スティックの外側をしっかりと回してください。
ステップ5.製作時の調整のためスキップ(水色)
☓ボタンで確定
ステップ6.製作時の調整のためスキップ(赤紫)
☓ボタンで確定
白点灯でキャリブレーションが完了した合図です。
--------最後に---------
ステップ7.全ての設定が完了したら設定ロックをON(赤点灯)
コマンド: L1 + R1 + L2 + R2 + L3 + R3 を2秒間長押し(緑点灯した場合は、再度コマンドを入力)
注意事項
・キャリブレーションを行う際は、必ず両方のスティックで行ってください。
・キャリブレーション後に誤作動が起こった場合は、ステップ1に戻りキャリブレーションをやり直してください。
■初期化・リセットの方法
初期化とは?
初期化を行うと、コントローラーの設定が工場出荷時の状態に戻ります。カスタム設定をリセットしたい場合や、不具合が発生した際に有効です。※出荷時に適切な調整が行われているため、最初に行う必要はありません。
初期化でリセットされる設定
・カスタムプリセット(入力距離調整)
・キャリブレーション
・内側デッドゾーン
・ニュートラルポジション
初期化でリセットされない設定
・標準プリセット(真円モード、PS5純正モード)
・背面ボタン/パドルの設定
初期化後に必ず行うこと
初期化後は、必ずキャリブレーションを行ってください。設定を行わないと、スティックの動作が正常に機能しません。
■初期化・リセットの手順
--------前準備---------
ステップ1.コントローラーの設定ロックを解除する(緑点灯)
コマンド: L1 + R1 + L2 + R2 + L3 + R3 を2秒間長押し(赤点灯した場合は、再度コマンドを入力)
--------初期化---------
ステップ2.初期化コマンドを5秒間長押し
コマンド: L2 + R2 + L3 + R3 を5秒間長押し
--------キャリブレーション---------
ステップ3.キャリブレーションのコマンドを入力
コマンド: L1 + R1 + L2 + R2 + ○ + × + △ + ▢ を同時押し
ステップ4.ニュートラルポジションの確定(赤色)
スティックを静止させた状態で☓ボタンを押す
ステップ5.入力可能範囲の指定(黄色)
LスティックとRスティックの外側を3周ほど回し、☓ボタンで確定
・必ず両方のスティックで行ってください。
・全⽅位の最⼤距離を計測するため、スティックの外側をしっかりと回してください。
ステップ6.製作時の調整のためスキップ(水色)
☓ボタンで確定
ステップ7.製作時の調整のためスキップ(赤紫)
☓ボタンで確定
白点灯でキャリブレーションが完了した合図です。
--------最後に---------
ステップ8.全ての設定が完了したら設定ロックをON(赤点灯)
コマンド: L1 + R1 + L2 + R2 + L3 + R3 を2秒間長押し(緑点灯した場合は、再度コマンドを入力)
注意事項
・キャリブレーションを行う際は、必ず両方のスティックで行ってください。
・キャリブレーション後に誤作動が起こった場合は、ステップ1に戻りキャリブレーションをやり直してください。
さぁ、新しいゲーム体験を。
ステップ1:背面のパドル固定具を反時計回り(左)に30度回します。
ステップ2:パドル固定具が取れますので、好みでパドルを 取り外し/取り付け てください。
ステップ3:外した時と同様にパドル固定具を左斜め30度の状態から被せて、時計回り(右)に30度回します。
以上でVoid INTUITIONのパドル 取り外し/取り付け が完了です。
Void Gaming
Void INTUITION リマッピングマニュアル
注意:コントローラーに電源が入っている状態で行ってください。
リマッピングができない場合はPS(ホーム)ボタンを10秒長押しして電源を切り、
その後PS(ホーム)ボタンを押して電源を入れてお試しください。
また、バッテリー残量が少ないと、リマッピングができませんのでご注意ください。
ステップ1:リマッピングモードに入る
L1 + R1 + X + □のボタンを同時に5秒以上長押しします。
ミュート部分のLEDが赤色に点灯すると、リマッピングモードが開始されます。
※注文番号が#30332よりも前の製品では、タッチパッド横のLEDが赤色に点灯します。
ステップ2:プロファイルの選択
リマッピングモードの状態で以下の操作をするとプロファイル(※)の選択ができます。
・十字キー↑ : プロファイル1(LEDが赤色に1回点滅)
・十字キー → : プロファイル2(LEDが赤色に2回点滅)
・十字キー↓ : プロファイル3(LEDが赤色に3回点滅)
・十字キー ← : プロファイル4(LEDが赤色に4回点滅)
※プロファイル機能とは背面パドルに割り当てを行ったリマッピング状況を保存できる機能です。
ステップ3:背面パドルへ割り当て
割り当てたい背面パドルを押しながら、設定したいキーやボタンを押し、同時に離します。
LEDが赤色に点滅すると、割り当てが成功したことを示します。
背面パドルの割り当てを「なし」にしたい場合は、背面パドルのみを押して離してください
ステップ4:保存&適用
Xボタンを押すと、リマッピング設定が保存されてリマッピングモードが終了します。
設定例
ステップ3で背面パドルを押しながら△を押し、同時に離す。
ステップ4で設定を保存後、該当の背面パドルを押すと△が反応します。
リマッピングのリセット方法
背面パドルが連打される等、不具合が発生した場合はまずリマッピングのリセットを行います。
1. 有線接続を解除し、コントローラーの電源を切る
2. ○✕□△ボタンを同時押しで5秒以上長押しする
3. ○✕□△ボタンを長押ししたまま有線接続してコントローラーの電源を再度入れる。LEDが3秒程赤色に点滅したらリセット完了。
さぁ、新しいゲーム体験を。
Void Gaming
背面ボタンのリマッピング方法
注意:コントローラーに電源が入っている状態で行ってください。
リマッピングができない場合はPS(ホーム)ボタンを10秒長押しして電源を切り、
その後PS(ホーム)ボタンを押して電源を入れてお試しください。
また、バッテリー残量が少ないと、リマッピングができませんのでご注意ください。
ステップ1:リマッピングモードに入る
L1 + R1 + X + □のボタンを同時に5秒以上長押しします。
ミュート部分のLEDが赤色に点灯すると、リマッピングモードが開始されます。
※光が弱い場合がございますので、暗い場所でお試しください。
ステップ2:プロファイルの選択
リマッピングモードの状態で以下の操作をするとプロファイル(※)の選択ができます。
・十字キー↑ : プロファイル1(LEDが赤色に1回点滅)
・十字キー → : プロファイル2(LEDが赤色に2回点滅)
・十字キー↓ : プロファイル3(LEDが赤色に3回点滅)
・十字キー ← : プロファイル4(LEDが赤色に4回点滅)
※プロファイル機能とは背面ボタンに割り当てを行ったリマッピング状況を保存できる機能です。
ステップ3:背面ボタンへ割り当て
割り当てたい背面ボタンを押しながら、設定したいキーやボタンを押し、同時に離します。
LEDが赤色に点滅すると、割り当てが成功したことを示します。
背面ボタンの割り当てを「なし」にしたい場合は、背面ボタンのみを押して離してください
ステップ4:保存&適用
Xボタンを押すと、リマッピング設定が保存されてリマッピングモードが終了します。
設定例
ステップ3で背面ボタンを押しながら△を押し、同時に離す。
ステップ4で設定を保存後、該当の背面ボタンを押すと△が反応します。
プロファイルの切り替え
L1 + R1 + X + □のボタン + プロファイル選択ボタン(十字キー)を入力することで
リマッピングモードに入ることなくプロファイルの切り替えが可能です。
リセット方法
背面ボタンやパドルが連打されてしまう等、不具合が発生した場合はまずリマッピングのリセットを行います。
1. 有線接続を解除し、コントローラーの電源を切る
2. ○✕□△ボタンを同時押しで5秒以上長押しする
3. ○✕□△ボタンを長押ししたまま有線接続してコントローラーの電源を再度入れる。LEDが3秒程赤色に点滅したらリセット完了。
さぁ、新しいゲーム体験を。
Void Gaming
背面ボタンのリマッピング方法
注意:コントローラーに電源が入っている状態で行ってください。
リマッピングができない場合はPS(ホーム)ボタンを10秒長押しして電源を切り、
その後PS(ホーム)ボタンを押して電源を入れてお試しください。
また、バッテリー残量が少ないと、リマッピングができませんのでご注意ください。
ステップ1:リマッピングモードに入る
L1、L2、R1、R2を同時に8秒間押し続けてください。
ミュート部分のLEDが赤く1秒光り、プログラミングモードに入ります。
※光が弱い場合がございますので、暗い場所でお試しください。
ステップ2:背面ボタンへ割り当て
割り当てたい背面ボタンを押しながら、設定したいキーやボタンを押し、同時に離します。
ミュート部分のLEDが赤く点滅したら割り当て成功です。
※背面ボタンの割り当てを「なし」にしたい場合は背面ボタンのみを押して離してください
ステップ3:保存&適用
割り当てた設定を保存し有効化するために十字キーの上を押します。
ミュート部分のLEDが赤く1秒光れば保存&適用完了です。
設定例
ステップ2で背面ボタンを押しながら△を押し、同時に離す。
ステップ3で設定を保存後、該当の背面ボタンを押すと△が反応します。
リセット方法
背面ボタンやパドルが連打されてしまう等、不具合が発生した場合はまずリマッピングのリセットを行います。
1. 有線接続を解除し、コントローラーの電源を切る
2. ○✕□△ボタンを同時押しで5秒以上長押しする
3. ○✕□△ボタンを長押ししたまま有線接続してコントローラーの電源を再度入れる。LEDが3秒程赤色に点滅したらリセット完了。
さぁ、新しいゲーム体験を。
Void Gaming
注意:コントローラーに電源が入っている状態で行ってください。
リマッピングができない場合はPS(ホーム)ボタンを10秒長押しして電源を切り、
その後PS(ホーム)ボタンを押して電源を入れてお試しください。
また、バッテリー残量が少ないと、リマッピングができませんのでご注意ください。
ステップ1:リマッピングモードに入る
L1 + R1 + X + □のボタンを同時に5秒以上長押しします。
タッチパッド(正面中央上あたり)部分のLEDが赤色に点灯すると、リマッピングモードが開始されます。
※光が弱い場合がございますので、暗い場所でお試しください。
ステップ2:プロファイルの選択
リマッピングモードの状態で以下の操作をするとプロファイル(※)の選択ができます。
・十字キー↑ : プロファイル1(LEDが赤色に1回点滅)
・十字キー → : プロファイル2(LEDが赤色に2回点滅)
・十字キー↓ : プロファイル3(LEDが赤色に3回点滅)
・十字キー ← : プロファイル4(LEDが赤色に4回点滅)
※プロファイル機能とは背面ボタンに割り当てを行ったリマッピング状況を保存できる機能です。
ステップ3:背面ボタンへ割り当て
割り当てたい背面ボタンを押しながら、設定したいキーやボタンを押し、同時に離します。
タッチパッド部分のLEDが赤く点滅したら割り当て成功です。
※背面ボタンの割り当てを「なし」にしたい場合は背面ボタンのみを押して離してください
※純正コントローラで再現できない入力は動作しません。
(例:←と→や↑と↓を背面に登録しても同時に入力出来ません)
ステップ4:保存&適用
Xボタンを押すと、リマッピング設定が保存されてリマッピングモードが終了します。
設定例
ステップ3で背面ボタンを押しながら△を押し、同時に離す。
ステップ4で設定を保存後、該当の背面ボタンを押すと△が反応します。
プロファイルの切り替え
L1 + R1 + X + □のボタン + プロファイル選択ボタン(十字キー)を入力することで
リマッピングモードに入ることなくプロファイルの切り替えが可能です。
リマッピングのリセット方法
背面ボタンが連打される等、不具合が発生した場合はまずリマッピングのリセットを行います。
1.コントローラーの電源を切った状態で○✕□△ボタンを同時押しで5秒以上長押ししてください。
2.○✕□△ボタンを長押ししたままコントローラーの電源を再度入れて、
タッチパッド部分のLEDが数回赤色に点滅したらリセット完了です。
さぁ、新しいゲーム体験を。
Void Gaming
注意:コントローラーに電源が入っている状態で行ってください。
リマッピングができない場合はPS(ホーム)ボタンを10秒長押しして電源を切り、
その後PS(ホーム)ボタンを押して電源を入れてお試しください。
また、バッテリー残量が少ないと、リマッピングができませんのでご注意ください。
ステップ1:リマッピングモードに入る
L1、L2、R1、R2を同時に8秒間押し続けてください。
タッチパッド(正面中央上あたり)部分のLEDが1回赤く光ります
※充電中の場合LEDの光が見えづらいためご注意ください。
ステップ2:背面ボタンへ割り当て
割り当てたい背面ボタンを押しながら、設定したいキーやボタンを押し、同時に離します。
タッチパッド部分のLEDが赤く点滅したら割り当て成功です。
※背面ボタンの割り当てを「なし」にしたい場合は背面ボタンのみを押して離してください
※純正コントローラで再現できない入力は動作しません。
(例:←と→や↑と↓を背面に登録しても同時に入力出来ません)
ステップ3:保存&適用
割り当てた設定を保存し有効化するためにタッチパッドのボタンを1回押します。
タッチパッド部分のLEDが赤く1秒光れば保存&適用完了です。
設定例
ステップ2で背面ボタンを押しながら△を押し、同時に離す。
ステップ3で設定を保存後、該当の背面ボタンを押すと△が反応します。
リマッピングのリセット方法
背面パドルが連打される等、不具合が発生した場合はまずリマッピングのリセットを行います。
1.コントローラーの電源を切った状態で○✕□△ボタンを同時押しで5秒以上長押ししてください。
2.○✕□△ボタンを長押ししたままコントローラーの電源を再度入れて、
タッチパッド部分のLEDが10回赤色に点滅したらリセット完了です。
さぁ、新しいゲーム体験を。
Void Gaming
注意:電池を入れた状態か、有線でつながっている状態(Voidマークのボタンが光っている状態)で設定をしてください。
プロファイル機能は背面ボタンの設定を記憶する機能となります。
◆プロファイル機能
本紙画像丸枠内のボタンをダブルクリックする度にプロファイルが1から順番に切り替わります。
▼プロファイルカラー
【プロファイル1:濃青色】【プロファイル2:緑色】【プロファイル3:水色】
【プロファイル4:黄緑色】【プロファイル5:紫色】【プロファイル6:薄青色】
【プロファイル7:無点灯】※背面ボタンが動作しない状態。
ステップ1:プログラミングモードに入る
設定したいプロファイルの選択後、本紙画像丸枠内のボタンを3秒ほど長押しします。
LEDが現在選択中のプロファイルカラーに点滅し、プログラミングモードに入ります。

ステップ2:背面ボタンへ割り当て
設定したいボタンを押しながら任意の背面ボタン(K1.K2.K3.K4)を2秒ほど長押しします。
LEDが赤色に高速点滅すると割り当て完了となります。
※割り当てを解除したい場合は、現在設定されているボタンと割り当てを解除したい背面ボタン(K1.K2.K3.K4)を長押しします。
割り当てが解除された場合はLEDが赤色にゆっくり3回点滅します。
【例】
背面ボタン(K2)にBボタンを設定している場合、背面ボタン(K2)とBボタンを長押しすることで割り当てが解除されます。
ステップ3:保存&適用
設定を保存し、背面ボタンの割り当てを有効化するために本紙画像丸枠内のボタンを再度3秒ほど長押しします。
LEDが点滅から点灯に変われば設定完了です。
さぁ、新しいゲーム体験を。